luckybites
  • home
  • about
  • buzz
  • recipes
  • contact
  • shop
  • home
  • about
  • buzz
  • recipes
  • contact
  • shop
where design + flavor intersect

Spicy Stamped Cookies

1/22/2019

2 Comments

 
FeedFeed
Cookie stamps are all the rage right now, but you don't need to spend any money! look through your kitchen drawers and you'll find creative ways to add texture to these cookies. and maybe in the process you can get a head start on spring cleaning...? um, ok maybe not. bake these cookies instead—WAAAY more fun.

​
Everyday kitchen tools make awesome cookie stamps. (see photo at bottom) BTW if you want any of the cookies stamps pictured at the bottom of this post, they're in my amazon shop. 

​I updated the recipe with a vegan option. you'll see it mentioned in the ingredients below. check the label of your plant based butter--if it has salt (almost all do), then adjust the salt amount accordingly, or skip entirely.

​​Spices courtesy of Burlap & Barrel.

​
Picture
Recipe:

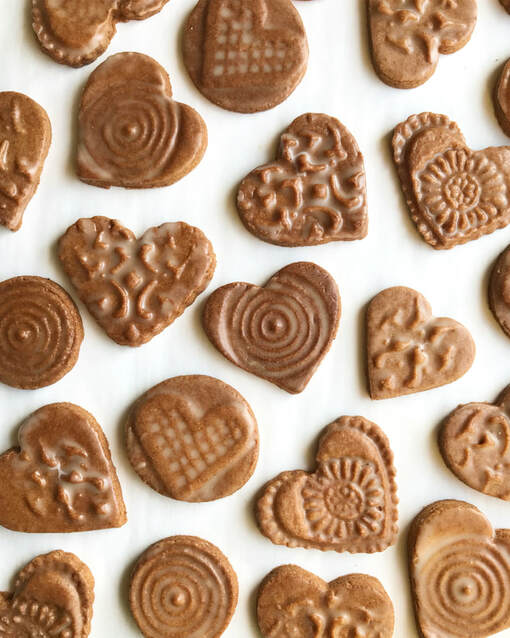
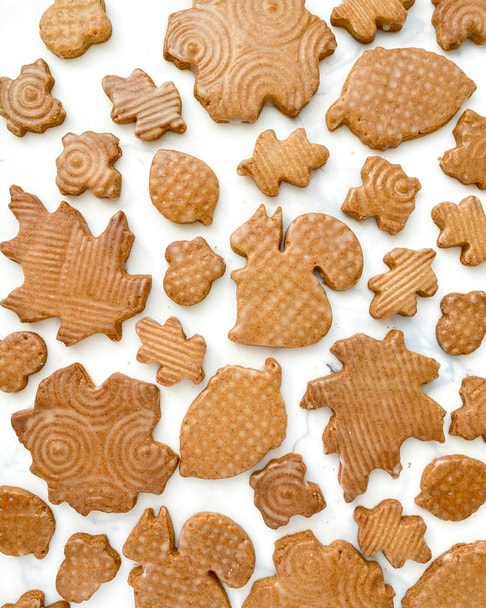
Yield: About 3 dozen 2.5" cookies

cookie ingredients:
1 cup (2 sticks) unsalted butter, softened
1/2 cup granulated sugar

3/4 cup light brown sugar, packed
3/4 tsp baking powder
3/4 tsp salt (
vegan: reduce/skip the salt if your butter contains salt)
3 tbsp pumpkin spice mix (recipe below)

1 egg (vegan: 1 flax egg)
2 ½ cups all-purpose flour
 ​
​
spice mix ingredients:
3 tbsp cinnamon
2 tbsp ginger
​1 ½ tsp nutmeg
​1 ½ tsp cloves
3/4 tsp allspice
3/8 tsp cardamom

glaze ingredients:
2 cups confectioners' sugar 
​3/4 tsp spice mix (recipe above)
warm water

pinch salt

you will also need:
stamping tool
​Parchment paper or silicone baking mat
wax paper
​food safe paintbrush

method:
  1. Preheat oven to 350°. Line baking sheets with parchment paper or baking mat.
  2. Using a stand mixer with paddle attachment, cream butter and sugars on medium speed until well blended. Add baking powder, salt, spice. mix for one minute. Add egg. mix until well-combined.
  3. Stir in flour just until incorporated and smooth, scraping down sides of the bowl as needed. Do not over mix. Dough should be firm and hold together well, but should no longer be sticky. It should easily fall away from sides of bowl and paddle. You may need to adjust flour quantity.
  4. Divide dough in thirds and place each third on a sheet of wax paper. form into a flat disc. Cover disc with another sheet of wax paper, sandwiching the dough between the two sheets.
  5. Roll out to 1/4" thickness, smoothing any creases that develop in wax paper.
  6. Peel away & replace one sheet of wax paper (this will prevent dough from sticking when cutting cookies, and keep work surface clean). flip "sandwich" over & remove top sheet of wax paper, leaving other sheet underneath dough.
  7. Dip stamping tool in flour to prevent sticking, and then press into dough. Make sure to press firmly so texture is pronounced enough to survive baking, but not too much that cookie becomes too thin to handle. Cut out cookies & place on baking sheet, 1" apart. 
  8. Roll out scraps & repeat, until all dough is used up. you may need to refrigerate the rolled out scraps if they become to warm & sticky. Repeat these steps with the other discs.
  9. Bake in a preheated oven 8-10 minutes, rotating pans halfway through. Bake until cookies are a golden around the edges. 
  10. While cookies are baking, make glaze. blend 3-4 Tbsp water, powdered sugar, spice mix and salt until smooth. If needed, add a little more water and mix until it's a thick liquid consistency, similar to maple syrup. Cover bowl with a dish so icing doesn't dry out.  
  11. A couple of minutes after cookies come out of oven, while they're still warm, apply icing using paintbrush. work quickly, resisting the urge to go back and fix anything because the glaze starts setting in seconds. imperfections add to the texture and beauty! set the cookies on a baking tray to dry.
  12. Allow to dry for several hours before putting in an airtight container. store at room temperature for up to a week.
Picture
Picture
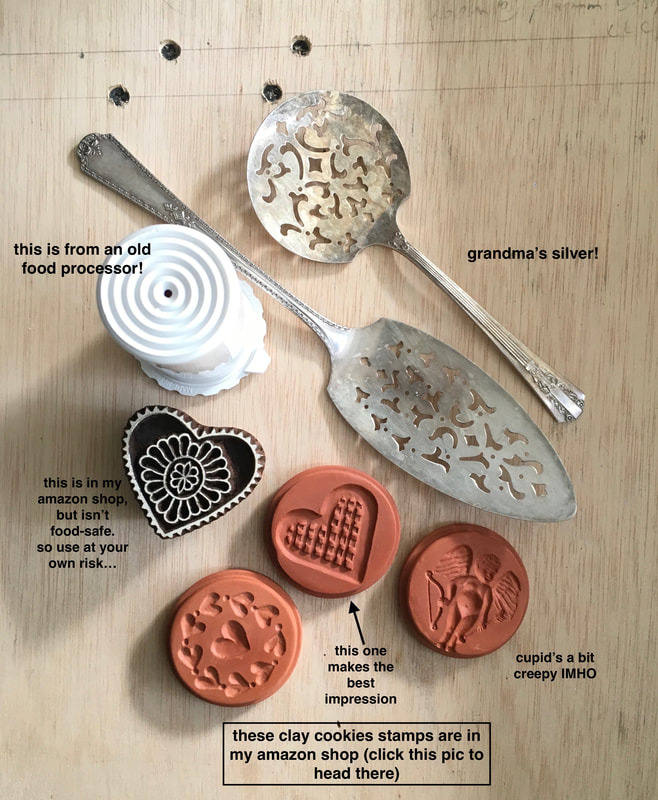
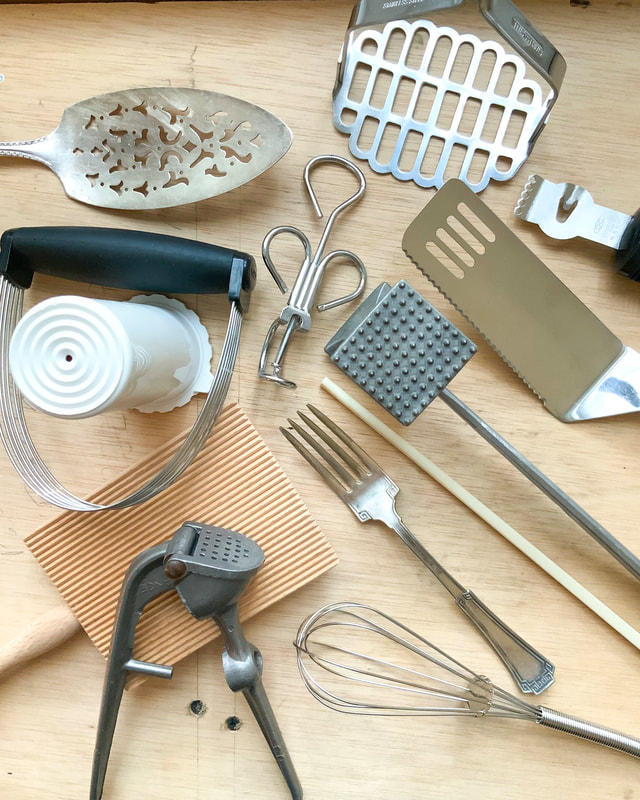
fork, whisk, spatula, potato masher, chopstick, garlic press, meat tenderizer, citrus stripper, cherry pitter, Cuisinart pusher tool, wire pastry blender, vintage pie server, gnocchi board.
Picture
2 Comments
Stacy Sobel
1/22/2019 01:54:54 pm

These are so pretty! They'd be lovely with apple cinnamon chai tea!

Reply
michele
11/18/2020 09:57:01 am

omg! so sorry i missed this, stacy. my mom was sick and i was taking care of her for most of 2019... that tea sounds perfect. i hope you tried the recipe. if so, let me know how they turned out!

Reply


Leave a Reply.

    I'm part of the Amazon Influencer Program, which basically means you can find my favorite baking tools all in one place! When you go to my shop, you'll see what I recommend, complete with helpful tips in the comments. Amazon gives me a small fee for any items purchased through my storefront, at no extra cost to you. Click the button below to access my shop!
    Picture

    Archives

    January 2022
    December 2020
    September 2020
    August 2020
    April 2020
    April 2019
    January 2019
    December 2018
    November 2018
    October 2018
    June 2018
    September 2017
    January 2017

    RSS Feed

    Categories

    All
    Almond
    Breakfast
    Brunch
    Cake
    Chocolate
    Citrus
    Cocoa
    Cookies
    Decor
    Decorated Cookies
    Edible Flowers
    Fruit
    Granola
    Herbs
    Holiday Cookies
    Icebox Cakes
    Icing Cookies
    Jam Cookies
    Lemon
    Linzer
    Marshmallow
    No Bake
    Olive Oil
    Royal Icing
    Sandwich Cookies
    Shortbread
    S'mores
    Snack
    Spices
    Sprinkles
    Stamped Cookies
    Sugar Cookies
    Vegan