luckybites
  • home
  • about
  • buzz
  • recipes
  • contact
  • shop
  • home
  • about
  • buzz
  • recipes
  • contact
  • shop
where design + flavor intersect

Stamped Chocolate Shortbread

1/16/2022

0 Comments

 
Picture
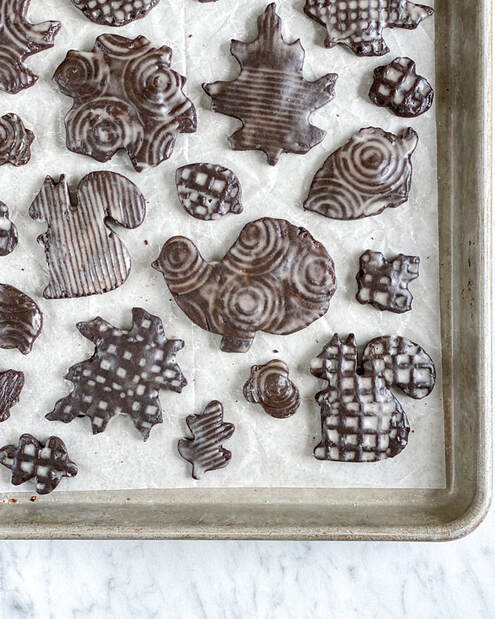
No need to buy cookie stamps...use kitchen tools to create texture!
​See my Spicy Stamped Cookie recipe for details on the tools–scroll to bottom for pix. If you don't feel like stamping, skip step 7 in the recipe. These cookies are just as yummy without texture. :-)

​
some tips:
  • butter — feel free to substitute vegan butter. i've done it and they turn out awesome. Most vegan butter has salt, but if you can find it, Earth Balance now has unsalted vegan butter sticks. If your butter has salt, omit the salt in the recipe.
  • black cocoa — if you don't have access to this oreo-like wonder, you can substitute natural cocoa. However, i HIGHLY recommend you make the effort to get it.​​

Yield: about 60 2” cookies

​Dough Ingredients:
1 cup (2 sticks) unsalted butter, softened
1 cup granulated sugar
½ teaspoon sea salt
1 tsp vanilla extract
¼ cup + 1 tbsp black cocoa (i use King Arthur)
½ cup unsweetened natural cocoa, plus 2-3 tbsp for coating stamp
1 3/4 cups all-purpose flour

Icing Ingredients:
2 cups confectioners' sugar
warm water
​pinch salt


tools:
stamping tool (optional)
​Parchment paper or silicone baking mat
wax paper
​food safe paintbrush
Method:
  1. Preheat oven to 325°. Line baking sheets with parchment paper or baking mat.
  2. Using a stand mixer with paddle attachment, cream butter, sugar, vanilla and salt on medium speed until well blended. scrape down sides of the bowl as needed.
  3. Stir in both cocoas, pulsing so you don't end up in a cocoa dust cloud, until just incorporated. Add flour and mix just until blended, being careful not to over-mix.  Dough should be firm and hold together well, but should no longer be sticky. You may need to adjust flour quantity.
  4. Divide dough in thirds and place each third on a sheet of wax paper. form into a flat disc. Cover disc with another sheet of wax paper, sandwiching dough between the two sheets.​
  5. Roll out to 1/4" thickness, smoothing any creases that develop in wax paper.
  6. Peel away & replace one sheet of wax paper (this will prevent dough from sticking when cutting cookies, and keep work surface clean). flip "sandwich" over & remove top sheet of wax paper, leaving other sheet underneath dough.
  7. Spoon a little cocoa into to a small, shallow bowl. Dip stamping tool in cocoa (to prevent sticking), and then press into dough. Make sure to press firmly so texture is pronounced enough to survive baking, but not too much that cookie becomes too thin to handle. Cut out cookies & place on baking sheet, 1" apart. 
  8. Roll out scraps & repeat, until all dough is used up. you may need to refrigerate the rolled out scraps if they become to warm & sticky. Repeat these steps with the other discs.
  9. Bake in preheated oven 8-10 minutes, rotating pans halfway through. cookies are done when surface is set and a delicious aroma is wafting around your kitchen. These are easy to burn since you can't see them browning, so make sure not to over-bake.
  10. While cookies are baking, make glaze. Blend 3-4 tablespoons of water, powdered sugar, and salt until smooth. If needed, add a little more water and mix until it's a thick liquid consistency, similar to maple syrup. Cover bowl with a dish so icing doesn't dry out.
  11. A couple of minutes after cookies come out of oven, while they're still warm, apply icing with paintbrush -- be sure to use a light touch so as not to disturb the texture, and work quickly, resisting the urge to go back and fix anything because the glaze starts setting in seconds. imperfections add to the texture and beauty! Set the cookies on a baking tray to dry.
  12. Allow to dry for several hours before putting in an airtight container. Store at room temperature for up to a week.
0 Comments


Leave a Reply.

    I'm part of the Amazon Influencer Program, which basically means you can find my favorite baking tools all in one place! When you go to my shop, you'll see what I recommend, complete with helpful tips in the comments. Amazon gives me a small fee for any items purchased through my storefront, at no extra cost to you. Click the button below to access my shop!
    Picture

    Archives

    January 2022
    December 2020
    September 2020
    August 2020
    April 2020
    April 2019
    January 2019
    December 2018
    November 2018
    October 2018
    June 2018
    September 2017
    January 2017

    RSS Feed

    Categories

    All
    Almond
    Breakfast
    Brunch
    Cake
    Chocolate
    Citrus
    Cocoa
    Cookies
    Decor
    Decorated Cookies
    Edible Flowers
    Fruit
    Granola
    Herbs
    Holiday Cookies
    Icebox Cakes
    Icing Cookies
    Jam Cookies
    Lemon
    Linzer
    Marshmallow
    No Bake
    Olive Oil
    Royal Icing
    Sandwich Cookies
    Shortbread
    S'mores
    Snack
    Spices
    Sprinkles
    Stamped Cookies
    Sugar Cookies
    Vegan